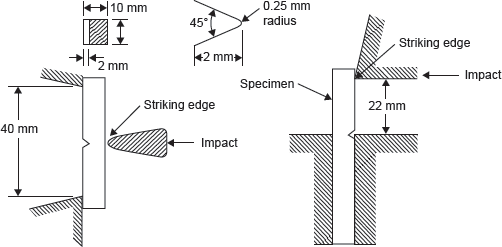
The behaviour of a material is also dependent on the rate at which the load is applied. For example, low-carbon steel shows a considerable increase in yield strength with increasing rate of strain. In addition, increased work hardening occurs at high strain rates. This results in reduced local necking, hence, a greater overall material ductility occurs. In design applications, impact situations are frequently encountered, such as cylinder head bolts, in which it is necessary for the part to absorb a certain amount of energy without failure. In the static test, this energy absorption ability is called ‘toughness’ and is indicated by the modulus of rupture. A similar ‘toughness’ measurement is required for dynamic loadings; this measurement is made with a standard impact test known as the Izod or Charpy test. When using one of these impact tests, a small notched specimen is broken in fixture by a single blow from a swinging pendulum. With the Charpy test, the specimen is supported as a simple beam, while in the Izod it is held as a cantilever. Figure 17.3 shows standard configurations for Izod and Charpy impact tests.
Table 17.1 Rockwell Scale and Major Loads
| Rockwell scale | Indenter | Major load |
|---|---|---|
| A | Brale | 60 |
| B | 1/16″ ball | 100 |
| C | Brale | 150 |
| D | Brale | 100 |
| E | 1/8″ ball | 100 |
| F | 1/16″ ball | 60 |
| M | 1/4″ ball | 100 |
A standard Charpy impact test machine consists essentially of a rigid specimen holder and a swinging pendulum hammer for striking the impact blow. Impact energy is simply the difference in potential energies of the pendulum before and after striking the specimen. The machine is calibrated to read the fracture energy in N m or J directly from a pointer which indicates the angular rotation of the pendulum after the specimen has been fractured. Similarly, Izod test is performed but the specimen is kept in the cantilever position.

Figure 17.3 (a) Charpy Test and (b) Izod Test
Leave a Reply