Hot working
Plastic forming of wrought metals by process operations such as forging, extrusion and rolling is performed under hot working or cold working conditions. Hot working is the plastic deformation and shaping of a metal above its recrystallisation temperature. A large number of dislocations are generated by strain hardening during the plastic forming of cast metal. The dislocation density may rise from 106–107 dislocations cm−3 in the cast metal to 1011–1012 dislocations cm−3 or more after heavy working. A high density of dislocations reduces the ductility and toughness and, in the worst case, can transform the wrought metal into a brittle-like solid. The loss in ductility limits the amount of shape forming before the metal begins to tear and crack.
Hot working is used to retain high ductility in the wrought metal by eliminating dislocations as soon as they form during plastic forming. Hot working can also produce a finer grain structure in the deformed metal owing to recrystallisation, which is a heat-activated process that involves the formation of new grains that are strain-free. The temperature to activate recrystallisation depends on many variables and is not a fixed temperature. Recrystallisation occurs above about 150 °C for aluminium, 200 °C for magnesium and 450 °C for most steels.
Hot working above the recrystallisation temperature is the initial step in the shape forming of most forged, extruded and rolled metals used in aerospace structures. The annihilation of dislocations and formation of strain-free grains provides the hot worked metal with high ductility. This allows thick ingots to be reduced to thin-walled components without tearing or cracking. Wrought metal components produced by hot working have a very fine equiaxed grain structure that provides high strength, fatigue resistance and ductility.
Cold working
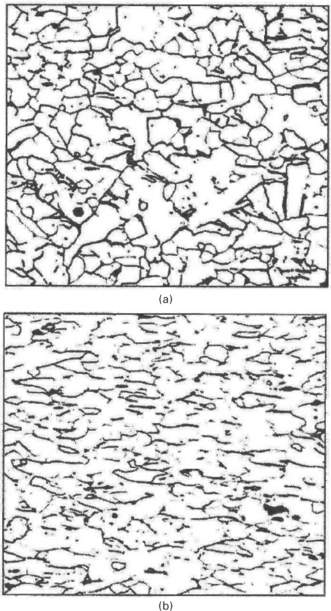
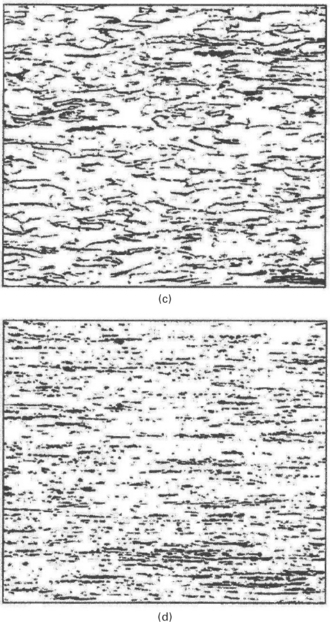
Cold working is the plastic shape forming of metals below their recrystallisation temperature, and the process is usually performed at room temperature. During cold working the microstructure is permanently deformed with the grains being elongated in the direction of the applied forming stress, as shown in Fig. 7.8. The grains elongate along certain crystallographic directions in the forming direction which gives a so-called textured or fibrous grain structure. Under high amounts of cold working the grains are stretched into long, thin crystals. An important difference between cold- and hot-working operations is that the texture is retained in the wrought metal after cold working but is largely removed by recrystallisation in hot-worked metal.


7.8 Progressive change from an equiaxed to fibrous (textured) grain structure of steel with increasing amount of cold working: (a) 10% cold work, (b) 30% cold work, (c) 60% cold work and (d) 90% cold work source: ASM handbook Vol. 9, metallography and microstructure, ASM International, Materials Park, OH, 1985.
The change in grain structure during cold working alters the mechanical properties of the metal. The strength properties increase with the amount of cold working because of the higher density of dislocations formed by strain hardening. However, the strength properties do not increase by the same amount in each direction of the cold worked metal. The strength properties become increasingly more anisotropic (i.e. not equal in all three dimensions) as the grain structure becomes more distorted and elongated in the forming direction.
The three directions of grain orientation in cold worked metal are called:
• longitudinal (L), which is parallel to the direction of working or the main direction of grain flow;
• long transverse (T), which is perpendicular to the direction of working; and
• short transverse (S), which is the shortest dimension of the wrought metal perpendicular to the direction of working.
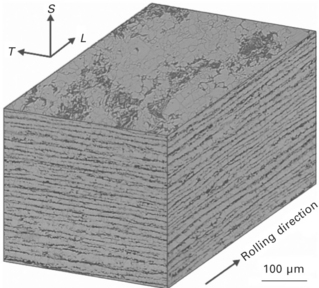
Figure 7.9 shows these three directions in a cold-worked metal. Hot-worked metal can also have a textured grain structure, although not as severe as cold-worked metal subject to the same amount of plastic deformation.

7.9 Textured grain structure showing the longitudinal (L), long transverse longitudinal (T) and short transverse (S) directions (from A. A. Korda, Y. Mutoh, T. Sadasue and S. L. Mannan, ‘In situ observation of fatigue crack retardation in banded ferrite-pearlite microstructure due to crack branching’, Scripta Materialia, 54, 2006, 1835–1840).
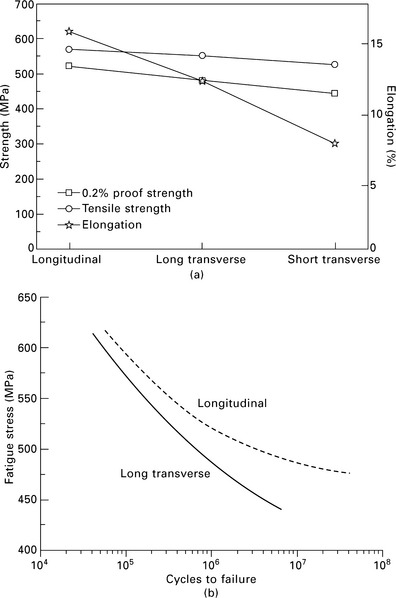
Figure 7.10 shows the effect of grain texture on the mechanical properties of several aerospace alloys. In general, properties such as yield strength, fatigue life and fracture toughness are highest in the longitudinal and long transverse directions and lowest in the short transverse (or through-thickness) direction. Highly textured grain structures also have an impact on the corrosion resistance of high-strength aluminium alloys. The longitudinal direction is the most resistant to stress corrosion cracking, followed by the long transverse direction, with the short transverse being the most susceptible to corrosion.

7.10 Examples of anisotropic mechanical properties in cold-worked alloys used in aircraft structures: (a) tensile properties of 7075 Al (from P. J. E. Forsyth and A. Stubbington, Metals Technology, 2 (1975), 158); (b) fatigue life of titanium alloy (Ti–6Al–4 V) (from Bowen, A. W., in Titanium science and technology, eds R. J. Jaffee and H. M. Burte, Plenum Press, New York, Vol 2, 1973).
The anisotropic properties of worked metals have important practical significance to their use in aerospace structures. Metals should be orientated in aircraft structures to ensure that the direction of highest mechanical performance (which is usually the longitudinal and long transverse directions) is parallel to the principal loading direction. For example, aircraft designers take advantage of the ~ 70 MPa higher strength of extruded aluminium products used in wing stringers and spars relative to rolled plate used for wing covers.
During cold-working operations, a small amount of the applied forming stress, perhaps about 10%, is stored as elastic strain energy within the tangled network of dislocations. This stored energy is called residual stress, and the magnitude of this stress increases with the amount of cold working. Residual stress within metal aircraft components may be beneficial or undesirable depending on the type of stress. The residual stress is not evenly distributed throughout the cold worked metal; compressive stresses occur at some locations and balancing tensile stresses occur elsewhere. Compressive residual stresses are advantageous, particularly when present at the surface or sites of stress concentration (e.g. fastener holes, cut-outs), because they counteract applied tension loads which cause fatigue cracking problems in metal structures. When the residual stress is tensile, however, it can facilitate the initiation and growth of fatigue damage. Residual stress should be removed from the metal component before it is built into the aircraft. Residual stress is relieved by a heat treatment process called stress-relief anneal, which involves heating the cold-worked metal to moderate temperature to allow the highly strained crystal lattice to relax.
Leave a Reply