Pyramid approach to aircraft certification
The certification of structural and engine materials is one of the most important issues with the testing and evaluation of new aircraft. Certification is also performed when new materials are used in major structural refits of existing aircraft, usually for life extension. Certification is essential to ensure the materials are safe, reliable, durable and functional in their structural application. New and improved materials cannot be introduced into aircraft without thorough analysis, testing and evaluation. A rigorous engineering assessment of the structural materials must be undertaken and passed before they are certified to use on aircraft and helicopters. The certification assessment involves mechanical and environmental (durability) testing of the material together with computation analysis using finite element modelling and other analytical methods. Aircraft certification is a complex, expensive and time-consuming process.
Certification regulations for structural and engine materials are specified by aviation regulatory agencies such as the Federal Aviation Authority (FAA) in the United States. Aerospace companies must ensure the materials pass the certification compliance standards specified by the regulation agency before being introduced to civil aircraft. Military organisations often use their own certification specifications and, although generally not as demanding as the civil specifications they still require extensive physical testing of the materials.
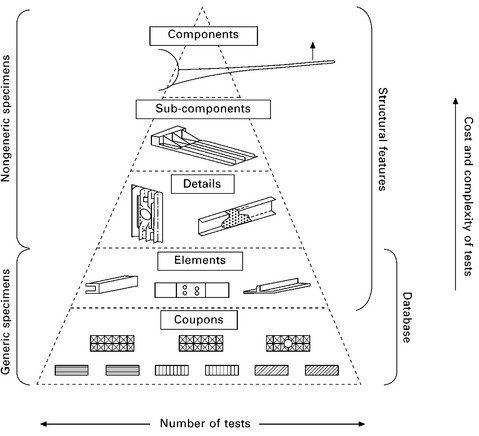
The certification procedure is often represented by the testing pyramid shown in Fig. 5.26. Often called the ‘building-block’ approach, this method is widely used by the aerospace industry to establish mechanical property data, property knock-down factors, and validation of critical design features for structures. Certification begins at the bottom of the pyramid. Mechanical properties of the material are determined by a series of tests at the ‘coupon level’, which means sample sizes about 100–200 mm long and 10–50 mm wide. Coupon tests are performed to determine basic property data, such as Young’s modulus, strength, fracture toughness, fatigue life and so on. The coupon tests are carried out under a standardised set of conditions which specify test parameters such as the sample size and loading rate. The test conditions are specified by standardisation organisations, such as the American Society for Testing and Materials. Large aerospace companies also have their own specifications for certain mechanical or durability tests not covered by the standards organisations.

5.26 Testing pyramid for certification of aerospace structural and engine materials.
Coupon tests are divided into quantitative or qualitative. Quantitative tests provide data that can be used for design purposes as well as certification. Examples of quantitative tests are the tension, compression and creep tests. Qualitative tests give results that can only be used for comparison purposes. For example, the hardness test and Charpy impact test provide a simple ‘go/no go’ assessment of materials. Certification testing at the coupon level involves measuring the material properties under different load conditions (e.g. tension, compression, bending) and operating environments (e.g. corrosive fluids, humidity, temperature). Simple drop weight impact tests are also performed, although other impact tests are often included at higher levels of the building block approach. These may include ballistic impact for critical military structures (e.g. main rotor blades), ice-hail simulation, bird strike simulation, and other program-specific impact tests.
Material allowables
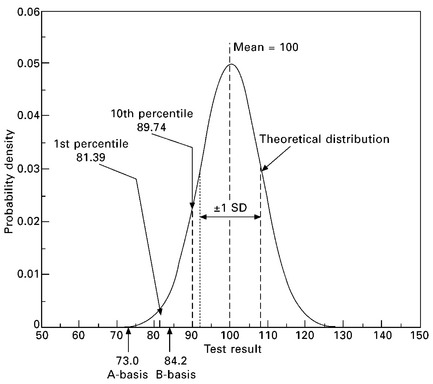
The number of coupon tests performed on a new material can range from several hundred to many thousand, depending on the material itself and its intended aircraft structural application. For example, Table 5.1 shows the types of tests and numbers of specimens for a composite material intended for a new aircraft design. A large number of coupon tests are necessary to provide a statistical database on the mechanical properties. This is because many properties, including yield strength, fracture toughness and fatigue life, are sensitive to small variations in the material. Minor differences in the alloy content, microstructure and defects (e.g. gas holes) between metal samples can result in significant differences in the properties. When a large number of coupon tests are performed on the same material then the amount of scatter in the mechanical properties is quantified. For example, Fig. 5.27 shows the variation in the mechanical property of a material which has a Gaussian-type distribution. The mean property value is 100, although the measured properties vary from about 72 to 128.
Table 5.1
Example of the number and types of coupon and element tests used to evaluate a new composite material for an aircraft structure
| Test type | Number of tests |
| Bolted joints (stiffness, strength) | 3025 |
| Laminate strength (tension, compression, etc.) | 2334 |
| Durability and long-term exposure | 585 |
| Interlaminar shear strength | 574 |
| Defect effects on mechanical properties | 494 |
| Crimping | 271 |
| Bonded repairs (stiffness, strength, etc.) | 239 |
| Ply properties (Young’s modulus, Poisson’s ratio, etc.) | 235 |
| Stress concentrations (open-hole tension, etc.) | 118 |
| Radius details | 184 |
| Total | 8059 |

5.27 Representation of statistical variations in the mechanical properties of materials.
Large databases which quantify the amount of scatter in the mechanical properties are essential for safe aerospace design. The databases are used to determine the so-called material allowables that are used in design analysis. The material allowables are often given under the headings of A or B. The A basis allowable defines the mechanical property values for materials used in safety critical aircraft structures such as the fuselage, wings and undercarriage. The confidence required in the property values for these materials is critical to aircraft safety. The mechanical property value using the A basis allowable is defined as the value above which 99% of the population of values fall within the distribution with a confidence of 95%. The B basis allowable is less stringent, and is applied to components where material failure does not result in the loss or excessive damage to the aircraft. The property value using the B allowable is the value above which 90% of the population of values is expected to fall with a confidence of 95%.
Structural certification
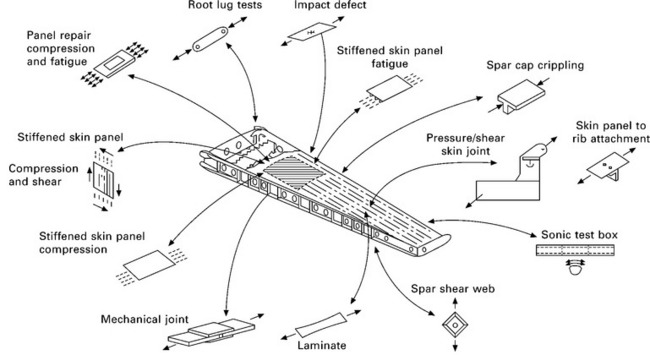
After the mechanical and environmental properties of the materials have been determined by an exhaustive series of coupon tests, the structural and environmental properties of aircraft components built using the materials are then measured by more testing on a larger scale. As shown in the certification pyramid, structural elements, details and subcomponents that represent increasingly complex and more complete sections of the final aircraft are tested. The final component (e.g. wing or fuselage) is constructed of different subcomponents which, in turn, are assembled from many structural details which contain a large number of elements. The elements, details and subcomponents contain structural design features not present in the coupon specimens, such as cut-outs, stringers, rib attachments, changes in section thickness, bolted or bonded connections. Tests that replicate the actual loading on the final component are performed on the elements, details and subcomponents to ensure they comply with the design specifications (Fig. 5.28).

5.28 Types of element and detail tests performed on a subcomponent of an aircraft wing.
Full-scale structural testing
Testing of the entire aircraft is the final stage of the certification process. The full-scale test is one of the most important ways of proving how well the aircraft meets its performance requirements. The test is extremely important because it tests all the components and materials of the aircraft in the most realistic manner by simulating actual flight conditions. A full-scale structural test is usually performed on one of the first four aircraft built. Full-scale tests are also performed on in-service aircraft that have undergone a major structural design change. Full-scale tests are used to ensure the aircraft is structurally sound after all the materials, elements, details and subcomponents have been fully integrated. The full-scale test is also important to determine the effect of secondary loading caused by complex out-of-plane loads, which may not be determined in earlier testing. Such loads arise from eccentricities, stiffness changes and local buckling which may not be fully predicted or eliminated in design nor represented by the structural detail specimen. Another important aspect of the full-scale test is the confidence that the aircraft is safe.
The full-scale component is tested under conditions given in the certification specifications to ensure it is fully compliant. For example, wing testing by Boeing of their B787 aircraft involved bending a complete wing upwards beyond the ultimate load (or 1.5 times the load limit) to the point of destruction (Fig. 5.29). The point was reached when the wing tips deflected by about 7.6 m above their normal position while enduring loads equal to about 500 000 lbf. In addition to this full-scale test, the aircraft was tested for 120 000 simulated flights, or double the expected life cycle, for fatigue performance. The simulated flights lasted about 4 min each and replicated taxiing, climb, cabin pressurisation and depressurisation, descent and landing. To add realism, the artificial flight conditions varied from completely smooth and level to extremely turbulent. It is only after such an exhaustive series of passed tests from the coupon to final component levels that the aircraft is certified by the aviation safety authority.

Leave a Reply