Simply stated, hardness is the resistance of a material to permanent indentation. Hardness is not a precisely defined engineering property, such as elastic modulus or yield strength, but it is still widely used to describe the resistance of materials to plastic deformation. The hardness of ductile materials is related to their yield strength, and the hardness test (which is simpler, faster and less destructive to perform than the tensile test) is often used to obtain a measure of strength.
Hardness is measured by pressing a hard indenter into the surface of the test material under a specific force (usually about 2 N), as shown in Fig. 5.15. The further the indenter sinks into the material, the softer is the material. The depth or size of the indentation left on the material surface after the indenter is removed is used to determine the hardness. The indentation should be large enough to obtain a bulk measurement of the hardness but small enough that it does not damage the surface finish or act as a stress raiser. The indentations produced by the hardness test are usually 0.1–1 mm wide and less than 0.5 mm deep.

5.15 Hardness test. The indentation left by the indenter is used to determine the hardness value.
Several methods are used to measure the hardness of metals, and the most common are the Brinell, Vickers and Rockwell tests. These tests are popular because they are quick, easy, inexpensive, nondestructive and can be performed on components of virtually any shape and size. However, hardness is not an intrinsic material property and cannot be used to describe the structural behaviour of a material under load. Instead, hardness numbers are used mainly as a quantitative basis for comparison between materials and to determine the consistency of the same material when produced in batches.
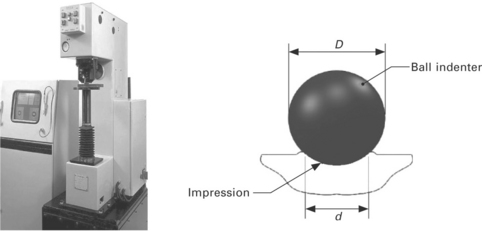
Figure 5.16 shows a Brinell test machine and the hardness indentation. The test involves pressing a hardened steel ball into the test material. The ball is 1, 5 or 10 mm in diameter and is pressed into the surface with an applied load of 30, 300 or 750 kgf. The ball size and load used increase with the hardness of the material. The ball is pressed into the material for a fixed period of time, usually 30 s, and then removed. The diameter of the indentation is measured using a microscope and the Brinell hardness number (HB) is calculated from the expression:

5.16 Brinell hardness test. photograph courtesy of directindustry. com
where F is the applied force (in kg), D is the diameter of the indenter (mm), and d is the diameter of the indentation (mm). The Brinell hardness number has the units of stress (Pa). Although hardness testing should only be used for quantitative comparisons between materials, the Brinell hardness number is closely related to the tensile yield strength of many metals by the simple relationship:
where HB has the units of kg mm−2. This means the Brinell hardness test can be used as a quick method for assessing the yield strength of metals.
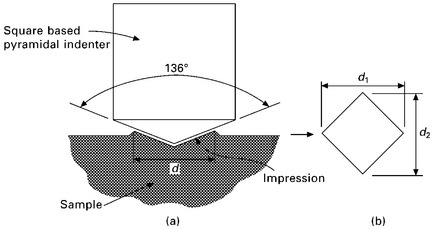
The Vickers hardness test works on a similar principle to the Brinell test, but with the key difference being that the indenter is a square-based pyramidal diamond rather than a hard ball (Fig. 5.17). The pyramid indenter is pressed into the material for a fixed time (usually 10–15 s), and the size of the two diagonals (d1 and d2) in the indentation are used to calculate the hardness. The hardness is reported as the Vickers hardness number (VHN).

5.17 Vickers hardness test: (a) Vickers indentation; (b) measurement of impression diagonals.
The Rockwell hardness test uses a small diameter steel ball indenter for soft materials and a diamond cone indenter for hard materials. The indenter is pressed into the material for a fixed time and its penetration depth is measured automatically by the Rockwell test machine and converted into the Rockwell hardness number (HR).
 [5.9]
[5.9]
Leave a Reply