A micrometer is also known as a screw gauge: It consists of a calibrated screw and is used for precise measurement of small length. The first ever micrometric screw was invented by William Gascoigne in the 17th century, as an enhancement of the vernier; it was used in a telescope to measure angular distances between stars and the relative sizes of celestial objects. There may be three different types of micrometers such as outside micrometer (used to measure wires, spheres, shafts, and blocks), inside micrometer (used to measure the diameter of holes), and depth micrometer (used to measure depths of slots and steps). Universal micrometer sets come with interchangeable anvils, such as flat, spherical, spline, disk, blade, point, and knife-edge. The term universal micrometer may also refer to a type of micrometer whose frame has modular components, allowing one micrometer to function as outside micrometer, depth micrometer, step micrometer, etc.
Micrometers use the principle of a screw to amplify small distances into large rotations of the screw that are big enough to read from a scale. The accuracy of a micrometer derives from the accuracy of the thread form. The amount of rotation of the screw can be directly and precisely correlated to a certain amount of axial movement, through the constant known as the screw’s lead. A screw’s lead is the distance it moves forward axially with one complete turn (360°). With an appropriate lead and major diameter of the screw, a given amount of axial movement will be amplified in the resulting circumferential movement. For example, if the lead of a screw is 1 mm, but the major diameter (here, outer diameter) is 10 mm, then the circumference of the screw is 10π, or about 31.4 mm. Therefore, an axial movement of 1 mm is amplified to a circumferential movement of 31.4 mm. This amplification allows a small difference in the sizes of two similar measured objects to correlate to a larger difference in the position of a micrometer’s thimble.
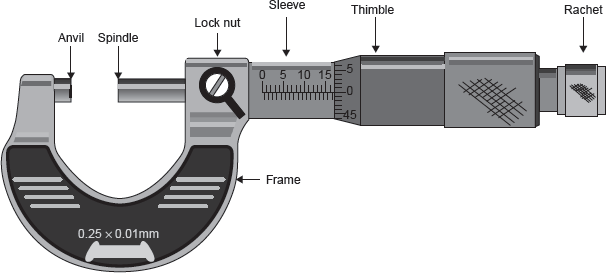
In a micrometer, the position of the thimble is read directly from scale markings on the thimble and shaft as shown in Figure 18.17. A vernier scale is often included, which allows the position to be read to a fraction of the smallest scale mark.

Figure 18.17 Micrometer
A micrometer is composed of the following components:
Frame: The C-shaped body that holds the anvil and barrel in constant relation to each other. It is thick because it needs to be rigid to minimize expansion and contraction, which may distort the measurement. The frame is heavy and consequently has a high thermal mass to prevent substantial heating up by the holding hand/fingers. It is often covered by insulating plastic plates which further reduce heat transference. If we hold the frame long enough so that it heats up by 10°C, then the increase in length of any 10 cm linear piece of steel is of magnitude 1/100 mm. For micrometers this is their typical accuracy range. Micrometers typically have a specified temperature, 20°C (68°F), at which the measurement is correct.
Anvil: The shiny part that the spindle moves toward and that the sample rests against.
Sleeve or Barrel: The stationary round part with the linear scale on it.
Lock Nut or Lock-ring: The knurled part (or lever) that one can tighten to hold the spindle stationary, such as when momentarily holding a measurement.
Screw: This is known as heart of the micrometer. It is inside the barrel.
Spindle: The shiny cylindrical part that the thimble causes to move toward the anvil.
Thimble: The part with graduated markings that one’s thumb turns.
Ratchet Stop: Device on end of handle that limits applied pressure by slipping at a calibrated torque.
Leave a Reply