Hardness means as the resistance to penetration. Testing for hardness can be divided into three categories:
- Scratch tests.
- Rebound tests.
- Indentation tests.
Scratch tests involve comparatively scratching progressively harder materials. Mohs hardness scale is used for the test. Diamond, the hardest material, is assigned a value of 10. Decreasing values are assigned to other minerals, down to 1 for the soft mineral, such as talc. Decimal fractions are used for materials intermediate between the standard ones where a material lies on the Mohs scale is determined by a simple manual scratch test. If two materials are compared, the harder one is capable of scratching the softer one, but not vice versa. This allows materials to be ranked as to hardness, and decimal values between the standard ones are assigned as a matter of judgment.
Rebound test employs techniques to assess the resilience of material by measuring changes in potential energy. For example, the Scleroscope hardness test employs a hammer with a rounded diamond tip. This hammer is dropped from a fixed height onto the surface of the material being tested. The hardness number is proportional to the height of rebound of the hammer with the scale for metals being set so that fully hardened tool steel has a value of 100. A modified version is also used for polymers.
Indentation tests produce a permanent impression on the surface of the material. The force and size of the impression can be related to a quantity (hardness) which can be related to the resistance of the material to permanent penetration. Because the hardness is a function of the force and size of the impression, the pressure (stress) used to create the impression can be related to both the yield and ultimate strengths of materials. Several different types of hardness tests have evolved over the years. These include macrohardness test such as Brinell, Vickers, and Rockwell and microhardness tests such as Knoop and Tukon.
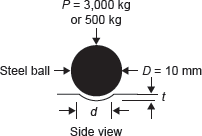
Brinell Hardness Test: In this test, a steel ball is used with a relatively large force. The force is usually varied for different materials. The Brinell hardness number is obtained by dividing the applied force, P, in kg, by the actual surface area of the indentation which is a segment of a sphere.


where D is diameter of the ball in mm, d is diameter of the indentation at the surface in mm, and t is the depth of the indentation from the surface.
Brinell hardness is good for averaging heterogeneities over a relatively large area, thus lessening the influence of scratches or surface roughness. However, the large ball size precludes the use of Brinell hardness for small objects or critical components where large indentations may promote failure. Another limitation of the Brinell hardness test is that because of the spherical shape of the indenter ball, the BHN for the same material will not be the same for different loads if the same size ball is used. Thus, geometric similitude must be imposed by maintaining the ratio of the indentation load and indenter.

The load on the ball depends on its diameter. The ratio of load and square of ball diameter varies for different materials, for example, for steel ![]() , for copper
, for copper ![]() , and for aluminium
, and for aluminium ![]()
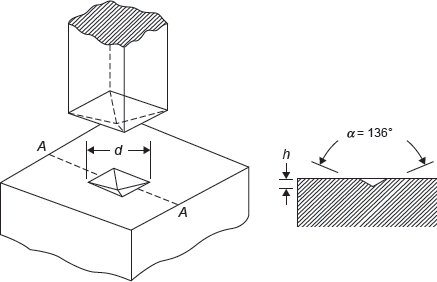
Vickers Hardness Test: In Vickers hardness test, the principle of operation is same as in Brinell hardness test. However, a four-sided diamond pyramid is implied as an indenter rather than a ball to promote geometric similarity of indentation regardless of indentation load (Figure 17.2). The included angle between the faces of the pyramid is 136°. The resulting Vickers indentation has a depth (h) equal to 1/7 of the indentation size (L) measured on the diagonal. The Vickers hardness is obtained by dividing the applied force by the surface area of the impression.

Figure 17.2 Vickers Hardness Test

where P is the indentation load which typically ranges from 0.1 to 1 kg but may be as high as 120 kg, L is the diagonal of the indentation in mm, and a is the included angle of 136°. The main advantage of the Vickers hardness is that the result is independent of load. However, disadvantage is that it is somewhat slow since careful surface preparation is required. In addition, the result may be prone to personal error in measuring the diagonal length along with interpretation.
Rockwell Hardness Test: The Rockwell test is the most commonly used hardness test. In this test, penetration depth is measured, with the hardness reported as the inverse of the penetration depth. A two-step procedure is used. The first step ‘sets’ the indenter in the material and the second steps the actual indentation test. The conical diamond or spherical indenter tips produce indentation depths, the inverse of which are used to display hardness on the test machine directly. The reported hardness is in arbitrary units, but the Rockwell scale which identifies the indentation load and indenter tip must be reported with the hardness number. Rockwell scales include those in Table 17.1.
Leave a Reply